The moderation tool in the PowerReviews Portal allows you to customize the way you review your content via Searches, Channels, and Worklists.
This article contains the following sections:
Searching Your Native Reviews
A Native Review is defined as a review you collect through your website, either via a Follow-Up Email solicitation or via a Fly-By Review.
If you're interested in only seeing content that meets certain criteria, you can search your natively collected review content accordingly. For example, you may only want to see reviews with a 3-star rating for a specific product during a certain time range.
To begin:
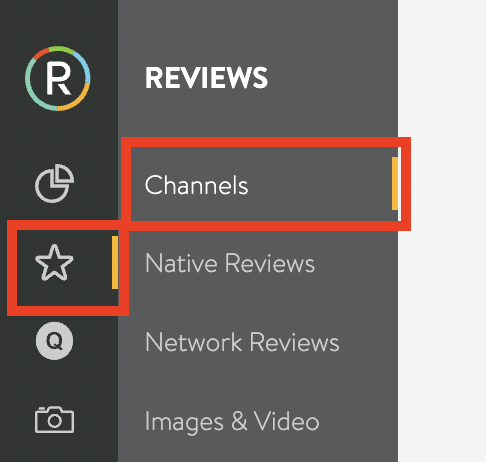
1. Log into the PowerReviews Portal
2. Navigate to the star icon in the left-hand menu
3. Click Native Reviews
4. Enter your criteria in the relevant search fields (below)
5. Click Search
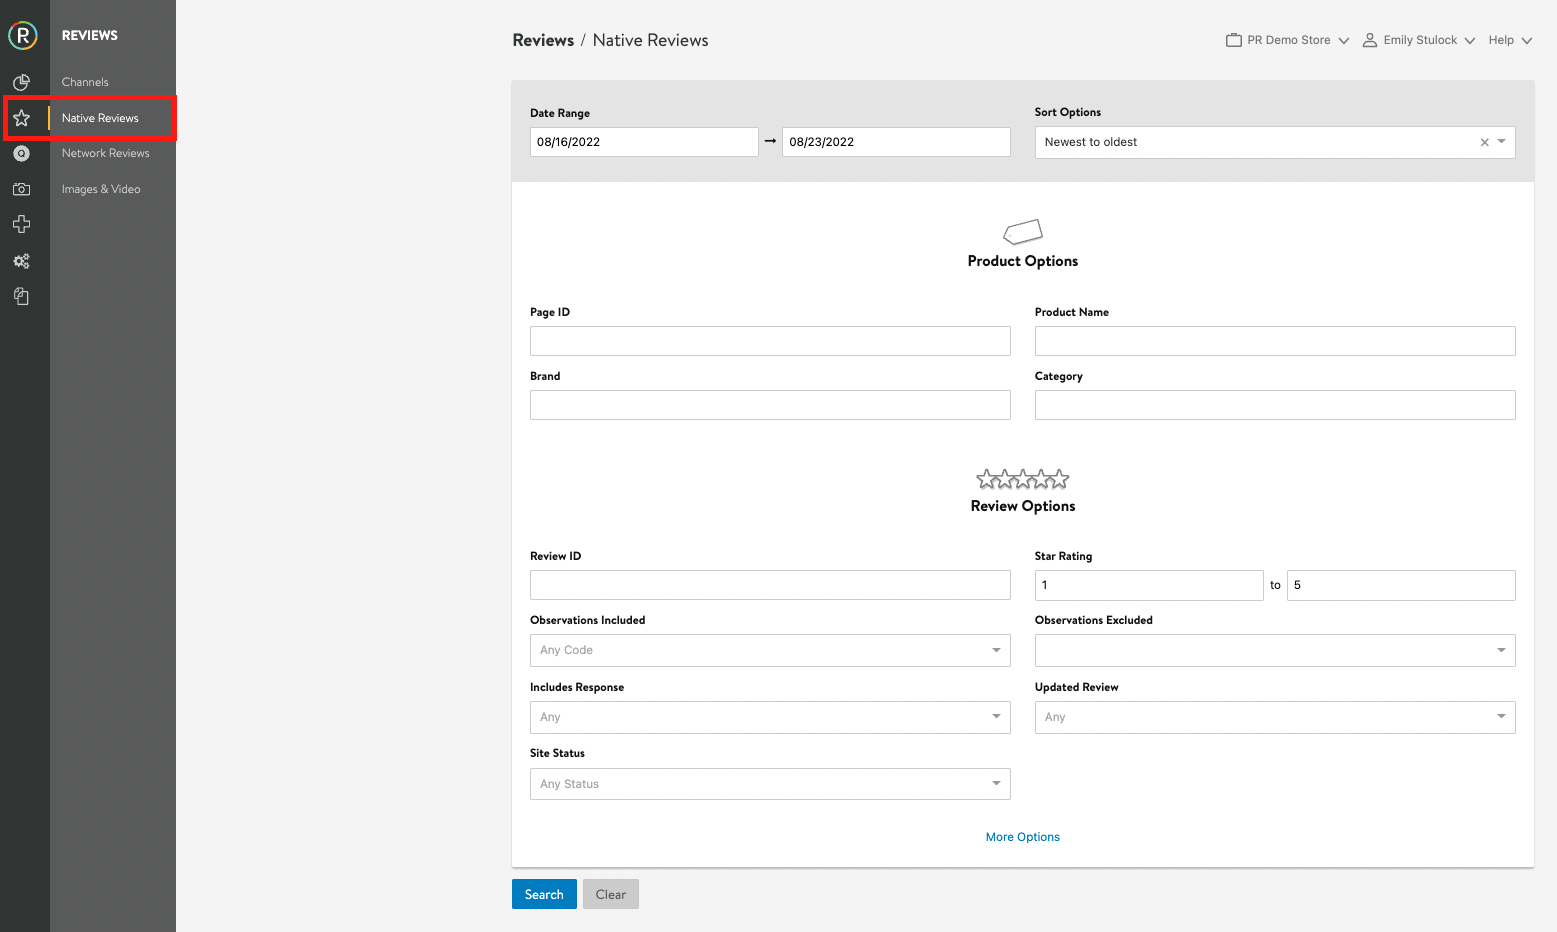
Native Review Search Fields
1. Required Fields - specify a date range and a sort order for your results
2. Product Options - narrow your search to focus on a specific product or type of product:
- Page ID - enter the page ID of the product
- Product Name - enter the name of the product
- Brand - enter the brand of the product
- Category - enter the category of the product
3. Review Options - narrow your search further to focus on specific attributes:
- Review ID - enter the review ID of a specific review
- Star Rating - enter a star rating between 1 and 5 stars
- Observations Included - select a moderation Observation code from the dropdown to include (for example, select PII if you want to look at content that's been marked as containing Personally Identifiable Information)
- Observations Excluded - select a moderation Observation code from the dropdown to exclude (for example, select Retail/Comp if you want to avoid looking at content that's been marked as containing retail or competitor mentions)
- Includes Response - select Yes/No to include/exclude reviews that have Merchant Responses
- Updated Review - select Yes/No to include/exclude reviews that have been updated after their original submission
- Site Status - select a Published or Unpublished review site status
- Author - enter the author/nickname for a review
- Headline - enter the headline of a review
- Catalog - if your account has multiple merchants, select the merchant catalog you want to run your search against (leaving this open will run your search against all merchants)
- Merchant User Email - enter the reviewer's email address
- Comments Keyword - enter a specific keyword you want to see in the review comments (for example, reviews that mention "uncomfortable")
- Device ID - enter the device ID of a particular device where content was written and submitted from
Other Content Search Fields
1. Images & Videos
- Media ID - enter the media ID of the specific image or video
- Media Type - select image or video based on the media type you want to view
2. Questions
- Question ID - enter the question ID of the specific question
3. Answers
- Answer ID - enter the answer ID of the specific answer
4. More Options
- Content Disclosure Codes - find content that was generated from a Sampling or Sweepstakes campaign
Searching Your Network Reviews
A Network Review is defined as a review you receive through Syndication (ie., from the Open Network). You can search these reviews similarly to Native Reviews.
To begin:
1. Log into the PowerReviews Portal
2. Navigate to the star icon in the left-hand menu
3. Click Network Reviews
4. Enter your criteria in the relevant search fields (below)
5. Click Search
Network Review Search Fields
1. Required Fields - specify a date range and a sort order for your results
2. Product Options - enter the page ID of the product (this is also a required field when searching Network Reviews)
3. Review Options - narrow your search further to focus on specific attributes:
- Review ID - enter the review ID of a specific review
- Star Rating - enter a star rating between 1 and 5 stars
- Observations Included - select a moderation Observation code from the dropdown to include (for example, select PII if you want to look at content that's been marked as containing Personally Identifiable Information)
- Observations Excluded - select a moderation Observation code from the dropdown to exclude (for example, select Retail/Comp if you want to avoid looking at content that's been marked as containing retail or competitor mentions)
- Author - enter the author/nickname for a review
- Headline - enter the headline of a review
- Site Status - select a Published or Unpublished review site status
Channels
Channels allow you to easily access your content via buckets, where certain content meets certain specific criteria. Content that meets the Channel's criteria accumulates within a last-30-days period.
You can assign internal users to each Channel and can also set up alerts so that they receive a notification when new content is added.
To access your Channels, choose a Content Type (like Reviews) from the left-hand menu, then select Channels.
Understanding Channels
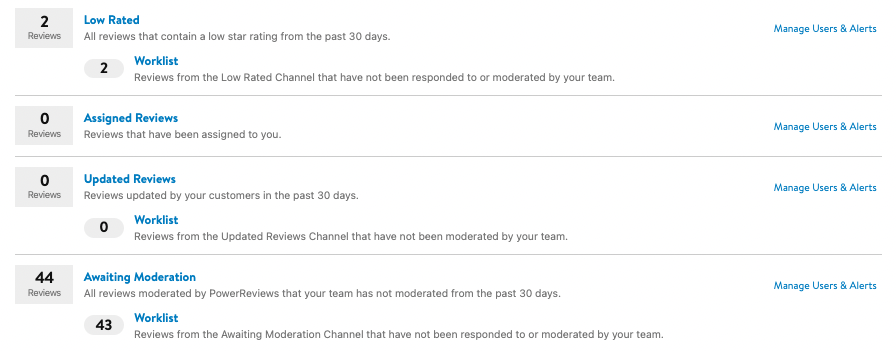
1. Channel Content Count - shows the amount of content within a particular Channel
2. Title & Description - shows the name of the Channel and gives an explanation of what the Channel contains (click the title of the Channel to see the content)
3. Manage Users & Alerts - takes you to tools where you can set up Channel email alerts, recipients, and frequency

Setting Up Channel Alerts
If you want to set up specific alerts for your users, click into Manage Users & Alerts for the Channel. A window appears where you can modify and control the alerts for that specific Channel.
1. Manage Users - select the users in your PowerReviews Portal account that you want to receive alerts
2. Manage Alerts - select how often you want alerts sent to the users you selected (by default, no alerts are sent to your users)
3. Click Save once you finish selecting your users and updating the alert frequency
Channels by Content Type
The following Channels will appear under Reviews:
- Safety Alerts - reviews moderated by PowerReviews that contain an important safety issue from the past 30 days
- Safety Concerns - reviews moderated by PowerReviews that contain a safety concern from the past 30 days
- Customer Service Issue - reviews moderated by PowerReviews that contain a customer service issue from the past 30 days
- Escalated Reviews - reviews that contain words included in your escalated words list, and reviews that are escalated internally from the past 30 days
- Web Issue - reviews moderated by PowerReviews that describe a web issue from the past 30 days
- Legal Concern - reviews moderated by PowerReviews that contain a legal concern from the past 30 days
- Low Rated - reviews that contain a low star rating from the past 30 days (the default is less than or equal to a rating of 2 stars)
The following Channels will appear under Q&A:
- Unanswered Questions - all questions awaiting an answer from the past 30 days
- Assigned Questions - questions that have been assigned to you
- Safety Alerts - questions moderated by PowerReviews that contain an important safety issue from the past 30 days
- Safety Concerns - questions moderated by PowerReviews that contain a safety concern from the past 30 days
Worklists
Worklists are a way for your internal team to use a queue-based system to moderate, respond to, and assign user-generated content (UGC) to Subject Matter Experts (SMEs). Worklists use the existing Channels to filter content based on specific criteria such as Low Rated Reviews, Escalated Reviews, Unanswered Questions, and Awaiting Moderation.
Content
One of the main differences between the Worklist view and the standard Channel view is the content that is returned. While a Channel returns all content from the past 30 days that meets its criteria, the Worklist removes content that has been acted on by your team. This includes adding an Observation, changing the publication status, responding to or answering the UGC, or by assigning it to another user. This allows your team to see all new content as it comes in, and work to provide a better customer experience.
Content Locks
An additional feature of Worklists are content locks. These locks ensure that multiple users viewing the same Worklist will all see different content so that they do not interfere with each other's work.
Worklists are sorted from oldest UGC to newest UGC and include one-at-a-time viewing of content. This way, a user can focus on providing the customer with the result they need (moderating a review, answering a question or assigning it to another SME at your organization, etc.) before proceeding to the next available piece of UGC to action.
