Before you can publish an Experience, you must first create the Experience within the Social Pro tool. To learn more about creating an Experience, click here. To learn more about all steps in the Social Pro Experience Creation Process, click here.
This article contains the following sections:
- How to Publish an Experience
- Scheduling an Experience
- Testing in Staging Environments
- Multiple Experiences
- Making Changes to Published Experiences
- Hiding or Showing UGC
- JavaScript Embed
- Styling Experiences
How to Publish an Experience
Once you have created the Experience you want to use on your website, you have the option to Preview it. The Experience itself is a snippet of JavaScript that you can deploy on any area of your website; it will render wherever you put it.
Note: Experiences are auto-saved as you create them so nothing will get lost as you make changes during the creation/preview process.
When you click Preview Mode, it will open up Preview Settings where you can view your Experience.
When you are ready to Publish, click the Publish Settings button.
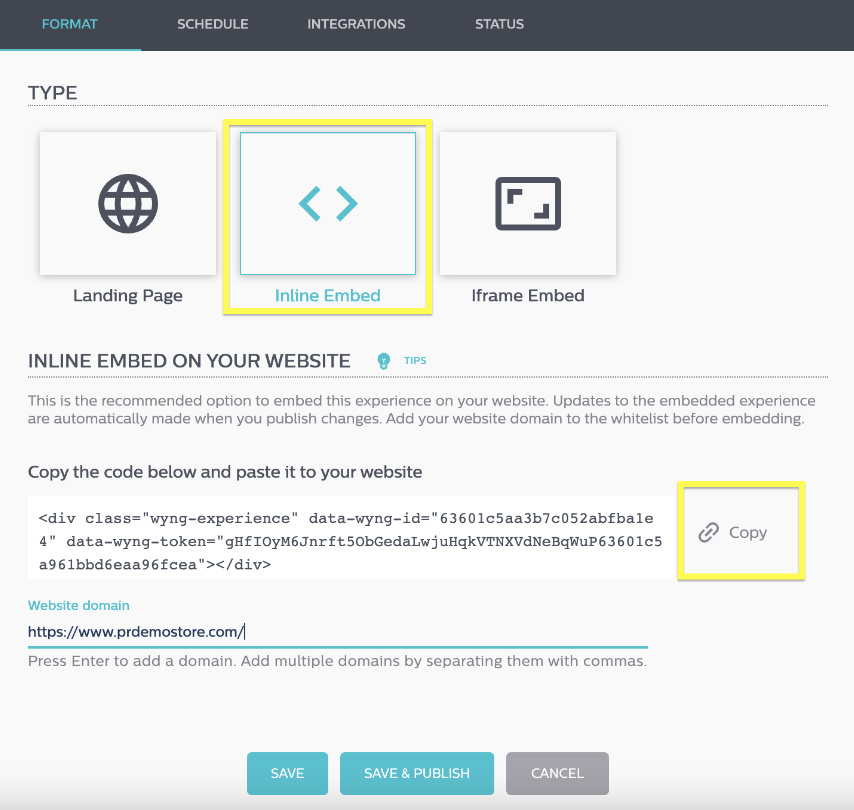
1. Under the Format tab, select Inline Embed
2. When publishing an Experience as Inline Embed, add the domain of your website under Website domain and press Enter. Only the high-level domain needs to be listed in the domain field (ie., https://www.powerreviews.com). The Enter key must be pressed in order for the domain to be added.
- If your website offers both http and https versions, add both versions to the domains list.
- For the Experience to display correctly, all domains must be added.
- If you plan to test your Experience on a staging site, add that domain as well.
3. Click Save & Publish
4. The Copy link allows you to copy the code to implement the Experience anywhere on your website in the desired location.
Note: JavaScript embeds are currently incompatible with the CAPTCHA.

Scheduling an Experience
You have the ability to schedule an Experience to go live at a later date or only be available for a certain time frame.
To schedule an Experience:
1. Navigate to the Schedule tab
2. You can start your Experience immediately or schedule it in advance
3. To set start/end dates, select the Configuration tab
4. Select custom dates/times from there, or set Start Time to Immediately and End Time to Never for an evergreen Experience
Testing in Staging Environments
As mentioned under How to Publish an Experience above, you can place the embed code in your staging site as long as you add your staging site's domain under the Publish Settings tab; you can then look at the Experience in advance.
There is an unpublished changes and unpublished version that you can always preview/schedule, too.
Multiple Experiences
You may have multiple Experiences embedded on the same web page using the JavaScript embed option. All embedded Experiences should be associated with the same Wyng property.
Making Changes to Published Experiences
You only need to generate the embed code once. Any changes made after the initial embed has been generated can be published inside the Experience itself by clicking Publish Settings. All changes update immediately, and you do not have to change the embed code.
Updates to the Flex Grid configuration are reflected on site immediately upon Publish. Updates to saved filters (settings, new content, etc.) are updated in 60 seconds or less, as content API requests are cached on CDN for low latency.
Hiding or Showing UGC
User-generated content (UGC) may be hidden from a particular PDP by removing it from the saved filter that is being displayed on the PDP. This can be done by changing the Moderation status from Approved to Pending, and removing a category tag.
JavaScript Embed
You will have the same Javascript embed for every Experience but within the div class "wyng experience," the data-wyng-id and data-wyng-token will be different. For example:
<div class="wyng-experience" data-wyng-id="123456" data-wyng-token="987654321"></div>
<script async src="https://dnsl4xr6unrmf.cloudfront.net/js/campaign.js"></script>
For each Experience you want on your website, you will have a different variation of the same code to embed wherever you want the Experience to live.
Styling Experiences
If you wish to style your Experiences beyond the out-of-the-box settings in the Experience Studio Configuration Panel, you have the ability to add Custom CSS and Custom JavaScript via the design panel. For further customization help, see Experience Options & Publication.